Idea完成springboot后端提供get、post接口前端调用 |
您所在的位置:网站首页 › spring boot idea创建 › Idea完成springboot后端提供get、post接口前端调用 |
Idea完成springboot后端提供get、post接口前端调用
|
Idea完成springboot后端提供get、post接口前端调用
前言idea创建springboot新建工程依赖和配置文件pom.xmlapplication.yml服务器配置spring相关配置mybatis配置
文件存放层级结构四层架构bean层mapper/dao层service层controller层抛出异常RrExceptionMyControllerAdvice
接口测试前端界面htmljs
运行项目
前言
练习项目——半成品,主要时间花在配置的各种细节上。 参考blog: 使用IDEA创建一个springboot项目 springboot|Controller接收处理GET,POST请求入参 Dao层,Mapper层,controller层,service层,model层都有什么作用 SpringBoot实现Java高并发秒杀系统之DAO层开发(一) eclipse的springboot项目搭建(前端到数据库,超详细) SpringBoot实现登录注册(mapper) MyBatis的学习(三)——Mapper XML 文件和parameterType的传入参数 springboot 如何优雅的抛出异常 前端学习网址w3school idea创建springboot 新建工程按照这个完成—>使用IDEA创建一个springboot项目 窗口中间勾选需要的依赖,漏勾选的可以之后在pom.xml写入 依赖和配置文件参考这个—> eclipse的springboot项目搭建(前端到数据库,超详细) pom.xml由于不同项目所需要的依赖不同,在此将该项目的pom.xml放上 4.0.0 org.springframework.boot spring-boot-starter-parent 2.5.6 com springboot 0.0.1-SNAPSHOT springboot Demo project for Spring Boot 11 org.springframework.boot spring-boot-starter-data-jpa org.springframework.boot spring-boot-starter-thymeleaf org.springframework.boot spring-boot-starter-web mysql mysql-connector-java runtime org.springframework.boot spring-boot-starter-test test org.springframework.boot spring-boot-devtools runtime org.mybatis.spring.boot mybatis-spring-boot-starter 1.2.0 com.fasterxml.jackson.core jackson-databind org.springframework.boot spring-boot-maven-plugin true src/main/java **/*.java src/main/resources **/*.*依赖配置后maven需要reload application.yml的功能和application.properties是一样的,yml优先级高于properties,建议使用yml。有properties的可以在同级目录创建同名yml文件配置好后删除properties。 配置注意排版保持一致键值对的冒号后有一个空格 服务器配置 server: port: 80 session-timeout: 30 tomcat.max-threads: 0 tomcat.uri-encoding: UTF-8 spring相关配置thymeleaf用于前端展示 注意数据库datasource的层级是在spring下 数据库url后面的serverTimezone等是为了项目和数据库的时区一至都是中国时区,不会造成存入数据少8小时,characterEncoding编码设定utf-8否则读取数据时会出现乱码 spring: thymeleaf: prefix: classpath:/templates/ suffix: .html mode: HTML5 encoding: UTF-8 content-type: text/html cache: false datasource: url: jdbc:mysql://localhost:3306/库名?serverTimezone=GMT%2B8&useSSL=false&useUnicode=true&characterEncoding=utf8 driver-class-name: com.mysql.cj.jdbc.Driver username: 用户名 password: 密码 initial-size: 10 max-active: 20 max-idle: 8 min-idle: 8 mybatis配置用于mapper映射,配置后对应的xml和bean可以指定查找路径 mybatis: type-aliases-package: com.springboot.bean mapper-locations: classpath:dao/*.xml 文件存放层级结构
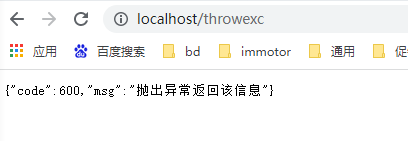
一个bean的实例实质就是一个类的实例。 一般数据库一个表对应一个bean——储存bean 后端返回前端数据,返回的内容对应bean——展示bean,可按照自己的习惯设定 一个bean需要有其get、set函数和构造器 展示举例: 存储bean: package com.springboot.bean; //对应数据库一张表 public class TestFirstU { private String creator_id; private long report_rule_id; private String reporter_id; public TestFirstU(String creator_id, long report_rule_id, String reporter_id) { this.creator_id = creator_id; this.report_rule_id = report_rule_id; this.reporter_id = reporter_id; } public TestFirstU() { } public String getCreator_id() { return creator_id; } public void setCreator_id(String creator_id) { this.creator_id = creator_id; } public String getReporter_id() { return reporter_id; } public void setReporter_id(String reporter_id) { this.reporter_id = reporter_id; } public long getReport_rule_id() { return report_rule_id; } public void setReport_rule_id(long report_rule_id) { this.report_rule_id = report_rule_id; } }展示bean: package com.springboot.bean; import java.util.ArrayList; //返回信息,msg public class AnswerRet { private int code; private String msg; public AnswerRet(int code, String msg) { this.code = code; this.msg = msg; } public AnswerRet() { } public int getCode() { return code; } public void setCode(int code) { this.code = code; } public String getMsg() { return msg; } public void setMsg(String msg) { this.msg = msg; } } mapper/dao层MyBatis的学习——xml讲解 spring 整合 mybatis时 mapper.xml文件应该放在什么位置? 对数据库进行数据持久化操作,方法语句是直接针对数据库操作。mapper层是直接跟数据库打交道的,他是个接口,只有方法名字,具体实现在mapper.xml文件里。 注意,mapper的接口需要需要使用@Mapper注解标识——因为SpringBoot系统中接口的XML文件不在/java目录下而是在/resources目录下。 接口中的方法用于查询数据是否存在,入参为creator_id和reporter_id。 对于Mapper接口方法中存在传递多个参数的情况需要使用@Param()标识这个参数的名称,不然Mybatis的XML中用的#{}不能识别出来你传递的参数名称是谁和谁对应的。 package com.springboot.dao; import com.springboot.bean.TestFirstU; import org.apache.ibatis.annotations.Mapper; import org.apache.ibatis.annotations.Param; @Mapper public interface TestFirstUMapper { //不重载函数,否则映射的xml对应的id都是一个,会报错 public TestFirstU checkHaveIt(@Param("creator_id") String creator_id); public TestFirstU checkHaveIt2(@Param("creator_id") String creator_id,@Param("reporter_id") String reporter_id);对应在xml中映射: 易错点: namespace:对应同名接口的具体位置而非xml的 sql语句中: id=对应接口的方法名 resultType=返回值类型 parameterType=入参类型 SELECT * from m_report where creator_id=#{creator_id} limit 1 SELECT * from m_report where creator_id=#{creator_id} and reporter_id=#{reporter_id} limit 1 service层存放业务逻辑处理,也是一些关于数据库处理的操作,但不是直接和数据库打交道,他有接口还有接口的实现方法,在接口的实现方法中需要导入mapper层。 在实际开发中的Service层可能被处理为实体Service层,而不是接口,业务逻辑直接写在Service(Class,不是Interface)层中,Controller直接调用Service,Service调用Mapper。 本项目使用中,testservice接口完全没用上,直接上实体Service层业务逻辑直接写在Service(Class,不是Interface)层中。 控制器,导入service层,因为service中的方法是我们使用到的,controller通过接收前端传过来的参数进行业务操作,在返回一个指定的路径或者数据表。 控制层主要创建接口,在此以两接口,请求方式分别为get、post为例: 主要通过注释来分辨是支持get请求还是支持post请求 post请求若设定前端调用时传入json,则传入参数需要注释@RequestBody 在此用map接收传入的内容,通过map的方法得到其中的值 抛出异常RrException在出现异常的情况项目也需要提示,因此在接口需要抛出异常来处理,在bean层创建一个异常RrException继承于RuntimeException springboot项目有全局拦截器可以更方便的捕捉异常,在控制层创建一个MyControllerAdvice 这样如果后端抛出异常则会调用MyControllerAdvice的errorHandler方法返回answerRet 创建一个接口测试: @RequestMapping("/throwexc") public String throwexc() { throw new RrException("抛出异常返回该信息",600); } 接口测试抛出异常测试: post请求:
在templates中放置html 以index2为例: 利用div布局 First: Last: 提交 提交2按钮点击事件的方法都写在了myjs1.js中 前端向后端传递json数据 myjs1.js: //get请求 function but_look(){ var urll="http://localhost/check?creator_id="+from1.first.value; var settings = { "url": urll, "method": "GET", "timeout": 0, }; $.ajax(settings).done(function (response) { if(response.code==100){ alert(response.msg); $('#from1')[0].reset(); //重置表单 之后操作跳转界面。。。 } }); return false; // 阻止表单自动提交事件 return false } function but_look2(){ var params={ "creator_id":from1.first.value, "reporter_id":from1.last.value }; var settings = { "url": "http://localhost/check2", "method": "POST", "timeout": 0, "headers": { "Content-Type": "application/json;charset=UTF-8" }, "data": JSON.stringify(params), }; $.ajax(settings).done(function (response) { alert(response.msg); }); return false; // 阻止表单自动提交事件 return false }在控制器层创建控制器专门用来返回web网页 在网页中输入http://localhost/index2 |
 注意,如果没有配置数据库,依赖带上了jdbc运行会报错,解决方法1:注释掉数据库的依赖 2、在yml配置数据库 3、在启动类的注释@SpringBootApplication禁用数据库自动配置


 TestServiceImpl 举例:
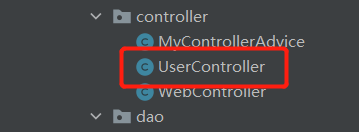


 get请求:


 提交按钮:get请求 一个参数
  提交2:post请求 json入参
【本文地址】
今日新闻 |
推荐新闻 |